Fade-in/out, automation , cutting tracks how does this work together

Hi everybody,

I like ardour, but sometimes it is a far too complex tool to understand things intuitive.

My actual problem is to find out best practice (for me :slight_smile: ) of mixing

I’ll give you my situation. As always I recorded a long rehearsal into a 4-track-session of 2.5 hours and now try to find the best/most succesfull songs after, mix them into a demo (for the start of the next rehearsal) .

First step is to export a well done song via “export”. This is the time where I always ask myself
what is the easiest way to export a song into a new project. What are your suggestions ?

I always end in creating a new project importing the tracks I exported minutes before.

My wish for christmas is, there would be a kind of “export region to new project”.

I would - for instance - right click on a region a dialog like the export-dialog would open up.
Now only a two parameters have to be edited/definded. Which tracks are to be exported ?
What’s the name of the new project. Everything else is defined by the session I’m in now,
including track names. Ready :slight_smile: No stem, no chosing of bitrate etc , this is all defined by the existing session. Think I proposed this in a post some time ago …

Now I begin to mix. Following I always talk about one track, to make things easier to describe.

In always every case i start with a fade in/fade out. This can only be done once, at start and end of my track. I tried to split a project in different regions, cause I thought this would give me the possibility
to insert several fades, but it doesn’t work for me. Is this idea realizable and if, what is the correct workflow to do it ?

Every fade in the end is a change of gain of the track … but what happens when I do a gain/fade automation over an already faded track, special again “over” the already faded start of a track ?
Is the fade-in start of a track faded again by automation ? If I’m at a point of the fadein of a track,
which has been faded to 50% and i do an automation of putting the gain to 50% again
is the result 25% gain (seen from the not edited track) ? Is the result done by a subtraction or
by multiplying (fadein: 100% → 50% , take what is left and subtracct 50% again vs 0.5*0.5 = 0.25 (=25%) ?

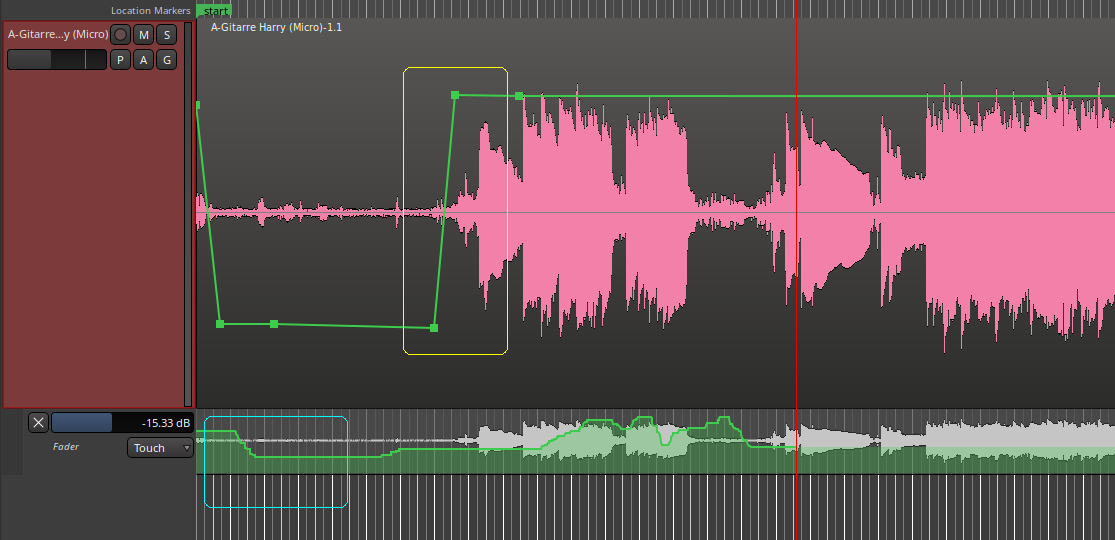
One option I found months ago is to set gain of parts of a track by hand-editing kind of an envelop curve.
Can’t find this anymore, please give me a hint how it’s done :frowning:

Yesterday i tried to delete a part in the middle of a track and wanted to fill the gap between the left two parts by glueing the parts together, can I do it without moving them by hand ?

As I said Ardour is not easy but it’s my favourite tool and I want to understand it better sometimes.

Best regards
Harry

Hi! I answer what I know…

If I understood correctly - you need to switch to the “Ripple” mode (this activates Range selection to all tracks) - than range-select the desired time & go: Track > Remove Time - this must delete all the time that includes in the selected range (all tracks & automation also).
remove_time_ripple_mode

@cooltehno: you don’t need to do both “Ripple-edit” and “Remove Time”.

Just select a Range, and set your ripple mode to “All”, and then press Delete. That will delete the audio selected under the range, close the gap, and also delete/remove the markers.

Alternatively you can select a Range and use the “Remove Time” feature, but in that case you don’t have to select Ripple.

Just FYI

-Ben

2 Likes

@HarryR,

I think you should investigate the “snapshots” feature.

Like you, I record a live band session of N tracks, and we rehearse perhaps 10-20 songs each night.

In my case, I’ll use largely the same mix&effects on every song, so I like to work in a single session and just set up named-ranges to export each song after I have a mix that works pretty well across songs. (automation can help if I want to add some reverb on a specific chorus or whatever)

However, if you want to make “very different” mixes for each of the songs, then you could try these steps:

  1. make a rough-mix … a nice starting-point for all your songs
  2. make a Range over the time that you want to mix (select ALL of your tracks)
  3. Edit->Crop will delete everything outside of that range
  4. Session->Snapshot(and stay on current) will stash that session so you can work on it later
  5. UNDO to get your whole recording back from the Crop
  6. Crop a new section, stash a new snapshot, and continue for N songs…
  7. Now open each snapshot individually, and do all the fancy edits and mixing without affecting the other songs.
1 Like

@BenLoftis

Thanks for clarifications&corrections! “Delete” simplifies the task!

I tried - that not work for all tracks - how can I select all tracks if the Slide and Lock modes have no option “All”? (I can use Ctrl+T combination of coarse, but this is +additional operation)
Thanks!

Thank you all, your hints were very helpful :slight_smile:

One thing I’m not sure of at this time is the different changing “modes” of gain.
I’ll give you my kind of theory and ask everybody to comment it.
The screenshot shows a random part of something I recorded sometime ago.

We’re in “Draw mode”, so I can edit general gain on a track (the yellow shape).

This is the “general” gain of a track. I can set gain to -inf and nothing can be heard anymore (or mixed)
by the gain controller of the mixer. I can set it to 0dB, which means the gain of the track is not changed in any way , it’s “the original” gain which was recorded. I can set it to -20dB which means the gain controller
in the mixer can now mix “upon” a lowered gain (seen from the original recording).

Also I can automate “fade” and edit gain again/too (blue shape). Automation,
in my understanding is a programmed/edited change on the gain controller of a track,
which can be overridden later by manually moving the gain controller of a track.

So, if I have a lowered gain to -20dB, can I (for example) set the gain back to 0dB by using the fader of a track, or am I now always beyond the -20dB-Border ?

Best regards

Faders do not have that much range in the positive direction. If you lower gain by 6dB you could set the gain back to 0dB with the fader at the top of the range.

Or you could use the trim control or an amp plugin to counteract the track gain automation.

If what you are asking is if all of those operations are sequential in the signal flow, then yes all are operating on the same data at different points in the flow, so one processor can undo or counteract another.

Thanks for clearing facts.

Is there somewhere a graphic, where the sequence
of a signal is visualized ?

best regards

If worried you might lose something, you could add 2 steps before following the quoted procedure:

  • save session
  • Session > Snapshot (switch to new)

Then from the new snapshot continue with crop / new snapshot (stay on current) / undo, until you’re done.

Maybe working with regions would be easier for you? Split your recording into regions as needed and manipulate the gain of regions instead of automating gain for the entire track.

Slide and lock modes aren’t relevant to removing time. Remove time only works with selected tracks, so you must first select the tracks (e.g. by ctrl-click or by Edit > Select > All tracks) you want to remove time from, then Tracks > Remove time.

Working with Ripple mode: All is easier.

1 Like

This page in the manual is probably the closest thing, although it does not make clear where the gain automation in the editor window falls in the signal chain:
Manual signal routing page

This topic was automatically closed 91 days after the last reply. New replies are no longer allowed.