How does the LUFS target + dbTP export algorithm in Ardour affect the dynamic range intentionally introduced into a mix?
I’m an amateur working on a cover of Jim Croce’s “Operator”; Yamaha electric piano, main/harmony/background vocals, that’s it. I use the YouTube/Deezer export preset as a kind of mastering step on my mix, so I can get an idea of how interim versions sound on various systems (my computer, headphones, in the car, and so on). For me the results are quite satisfactory but I kind of wonder if the export algorithm is affecting the loudness of the intro as compared to the rest of the song. I’m attenuating the intro to get a “subtly restrained” sound for the intro like in the original recording, but I feel like the export algorithm is controlling the overall average volume of the track and hence reducing the difference between the intro volume and the rest of the song.
Does that seem right? If so, would it be best to re-import the exported mix and adjust the gain on the intro to get the effect I want?
I haven’t noticed that quiet song passages are made louder during rendering. An analysis with the loudness assistant, which I use constantly, could clarify this.
My understanding is that the export adjusts levels uniformly such that no section is boosted more than another. (The limiter is going to affect louder parts more than quieter, though.)
I’ll be interested to know if my understanding on this is incorrect.
@mkindred thanks for the comment. I also use the loudness assistant but have not done any detailed analysis/comparisons of this track with different export settings. I’ll take a look at your suggestion that the limiter might be at fault … although there’s no option to disable the limiter in the “Normalize Loudness” GUI on export. The options seem to be “Limit to” and “constrain to”; I’ll have a look at the docs to try to understand the difference.
The intro to this track is 21 seconds out of an overall length of 250 seconds. So something like 8.5% of the total time. If there is some kind of averaging going on, it seems like a contiguous 8.5% chunk of the audio would be significant enough to be noticeably affected by the averaging - in this case making the intentionally soft 8.5% a bit louder in comparison with the remaining 91.5% of the track.
I’m listening the the rendered .wav. In two different headphones the (instrumental) intro “feels” louder than I want it, as compared to the body of the song. It sounds right when I listen to the actual mix in Ardour.
There’s certainly a chance it’s just me thinking I’m hearing something different between the raw mix in Ardour and the exported mix. I’m planning to do a more quantitative analysis using the loudness assistant/export analysis tools when I have some time.
There’s no dynamic processing, no compression / limitation applied when exporting in Ardour, only a gain adjustment (see docs). The only thing that could count as limiting is peak clipping above 0dB.
It sounds right when I listen to the actual mix in Ardour.
If you want to keep control over your dynamics you might want to apply the limiting yourself so that it sounds “right” (and avoid loudness normalization during export), and tweak it until you get the loudness measurements you’re after.
Thanks @jean-emmanuel@guth@mkindred for the comments. Particularly for the update concerning the limiter integrated in the export/normalize algorithm. All are quite helpful! Thinking of trying my hand at SoundCloud to solicit comments on the mix …
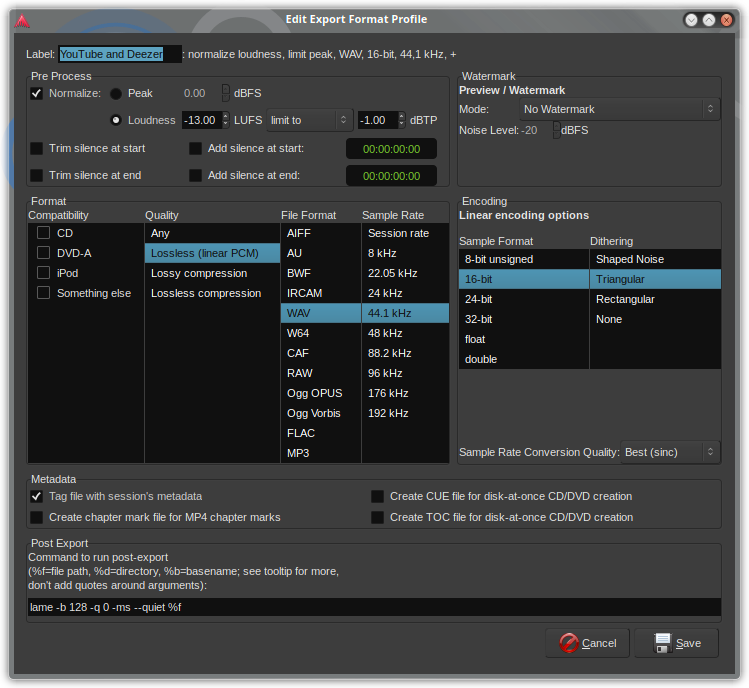
With the settings you show. First audio is analyzed and the integrated LUFS measured.
For the actual export the difference of measured gain and your target value (-13) is applied so that the resulting export reaches that as target. Any peaks higher than 1dBTP are processed by a limiter so that the signal does not exceed 1dBTP.
Thanks @x42 for the explanation. I think the limiter may be involved in the - very subtle - dynamics change I think I’m hearing.
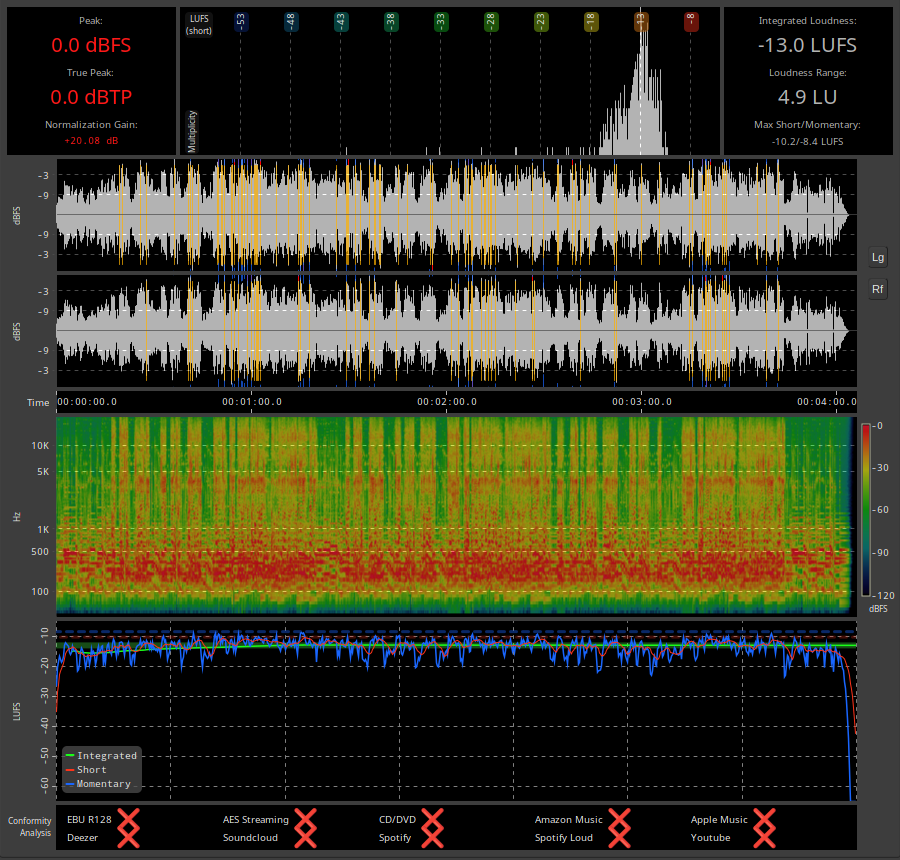
I ran the export with the limiter set to “limit to” 0 dBFS and got the analysis below.
Can you explain the meaning of the yellow, blue, and red bars on the dBFS vs time graph?
Is this graph the normalization gain?
What’s the difference between the “limit to” and “constrain to” picks on the export dialog? I browsed the Loudness Analysis and Export sections of the manual but didn’t see (or missed) any explanations.
Assuming that the yellow, blue, and red bars have something to do with where the limiter would affect the audio, I note that only the verses and refrains of the song are annotated in this way. The intro - the first 21 seconds - is not affected. Maybe this is actually enough to ever so slightly reduce the dynamic range between the song and the intro? Does the limiter have “attack/release” settings coded in?
constain picks the least amount of gain to reach one target levels.
In your case you need 20.08dB gain to each -13LUFS, but could only add around 15dB of gain before the signal would clip. So only 15dB gain would be added and the result would be -18LUFS (but 0dBFS).
limit to adds a much gain as needed to each the LUFS target and then shaves off potential peaks using a limiter.
–
The gain factor is constant. The graph is the waveform of the exported audio.
The yellow and red overlays the waveform and shows places where signal level reach -1dBFS (yellow) and clipping (>= 0dBFS, red).
The blue grows from the outside in, and shows signal reduction due to limiting.
A built-in version of x42 Digital Peak Limiter is used with a fixed release time of 10ms.
–
PS. As opposed to compressors, limiters don’t have attack, that would allow peaks to slip through.
@TonyBKDE Learn to do these things yourself. That way you can control everything and get the results you want before exporting. Lots of tutorials online…
Most excellent advice, indeed. As an amateur with a few courses under my belt, I feel like I’m part of the way down that road, but with many miles (km) to go.
Thank you @x42. I do think that this explains the slight difference I am hearing post-export.
I understand (and much appreciate) your clarification on the meaning of the colored bars on the waveform plot. I’m still puzzled by the units on the Y-axis of that plot, though. For instance, what is the difference between, say, -9 dBFS below the 0 dBFS line and -9 dBFS above the 0 dBFS line? The “rectified” view (Rf button) makes a bit more sense to me but I’m having trouble wrapping my brain around the un-rectified view.
The vertical middle is minus infinity dB, in other words: silence. The louder the signal the larger the value. From minus infinity to 0dBFS.
zero dBFS is the maximum possible signal relative to FullSscale. At the top and bottom of the waveform display.
Waveforms are not usually symmetric. A somewhat simple example: bass drum. when hit, the drum-head swings a bit more forward compared to when it returns. Or here maybe a DC offset caused by some old synths or some analog wiring that can shift the whole wave up/down…
–
The waveform display and spectrum in the post export dialog is mainly meant to spot simple obvious errors before delivering the exported music.
e.g. the spectrum display could show a constant high beep above 15k that you don’t hear, but others might. It can also show noise added by demo plugins. The waveform may show clipping, or a DC offset,…
Anyway in your case it looks fine, except dBFS and dBTP (true-peak) is not usually acceptable. aim for -1dBTP.
As for the slight difference, while possible, it is unlikely that you notice the limiter. I expect the 20dB gain to have “louder is better” effect
In any case you could also add a limiter to the master-bus, add crank up the trim knob at the top of the master bus by 20dB, and tweak things manually.
I am somewhat proud to say that for the vast amount of music, Ardour’s built-in export normalization does an amazing job, short of hiring a mastering engineer.
@x42 Thank you, Robin, I understand it now. That’s a very clear and complete explanation.
That’s completely correct. I am, in fact, finding that using Ardour’s export normalization is far more amazing and consistent than the one AI mastering tool I’ve tried, and rivals the results I got from hiring a professional mastering engineer.
As for pride, it is well-placed on your (and Paul’s, of course!) part and applies equally to every aspect of Ardour including your tremendous user support. Thanks so much.